Error while installing windows in new pc s

When you try to install Windows 10/8/7 on your computer, and the Windows Set up might report "Windows cannot be installed to this disk. The selected disk is of the GPT partition style." This is one of the common errors occur during Windows installation. Recently, it seems to become severe in Windows 10 because there are more and more users looking for an effective way to install Windows 10 on GPT partition.
Causes of "The Selected Disk is of the GPT Partition Style"
MBR and GPT are two formats of the hard disk. MBR stands for Master Boot Record, and GPT stands for GUID Partition Table. It is the traditional partition structure to manage disk partitions, and it is widely used by a majority of users due to its compatibility with most systems. GPT partition style is a newer standard for disk partitioning, which defines partition structure by GUID. It is part of the UEFI standard, which means the UEFI-based system should be installed on a GPT disk.
2nd
And to boot Windows from GPT, you should do two things. First, make sure your PC is booted in UEFI mode. Second, make sure that the motherboard of the device supports UEFI. If not, it is better to use MBR to boot from. So, when you get "The Selected Disk is of the GPT Partition Style" error in Windows 10/8/7 or other previous Windows versions, please first check if your PC is booted in UEFI mode. If no, please do it.
Steps to boot into UEFI mode:
Step 1: Reboot PC and enter BIOS.
Step 2: Enable UEFI boot > Save settings and exit BIOS.
Step 3: Continue to install Windows.
And if yes, it might suggest that your hard drive is not configured for UEFI mode. Here you have two choices to fix the issue.
Fixes for "The Selected Disk is the GPT Partition Style"
Option 1: Change BIOS mode from UEFI to Legacy
Step 1: Completely shut down your computer.
Step 2: Power on the system. As soon as the first logo screen appears, immediately press "F2" to enter the BIOS.
Step 3: Use the right arrow key to select "Boot".
Step 4: With Boot Mode highlighted, press "Enter", and then use the down arrow to select "Legacy BIOS".
Step 5: Press "Enter".
Step 6: Press "F10", and select "Yes" to save the change and exit the BIOS.
Option 2: Convert GPT to MBR
If the first method doesn't help too much, converting GPT to MBR disk . It is an easier way to fix "The Selected Disk is the GPT Partition Style" error. And you can do it by using Diskpart or EaseUS free partition software. The latter one is a better choice because it helps you to change partition type without deleting partitions or losing data.
Method 1: Convert to MBR using Diskpart
Step 1: Press "Win + R" to open Run dialog > Type: cmd and hit "Enter" to bring up Command Prompt.
Step 2: Type: diskpart.exe and hit "Enter" to open "DiskPart" window.
Step 3: Type: list disk and hit "Enter".
Step 4: Type: select disk g (Replace g with the drive letter or your disk that you want to change it to MBR.)
Step 5: Type: convert MBR and hit "Enter". Let the program to do the disk conversion task, and then there you'll get wanted partition table in your disk.
Step 6: Type: exit to finish the task.
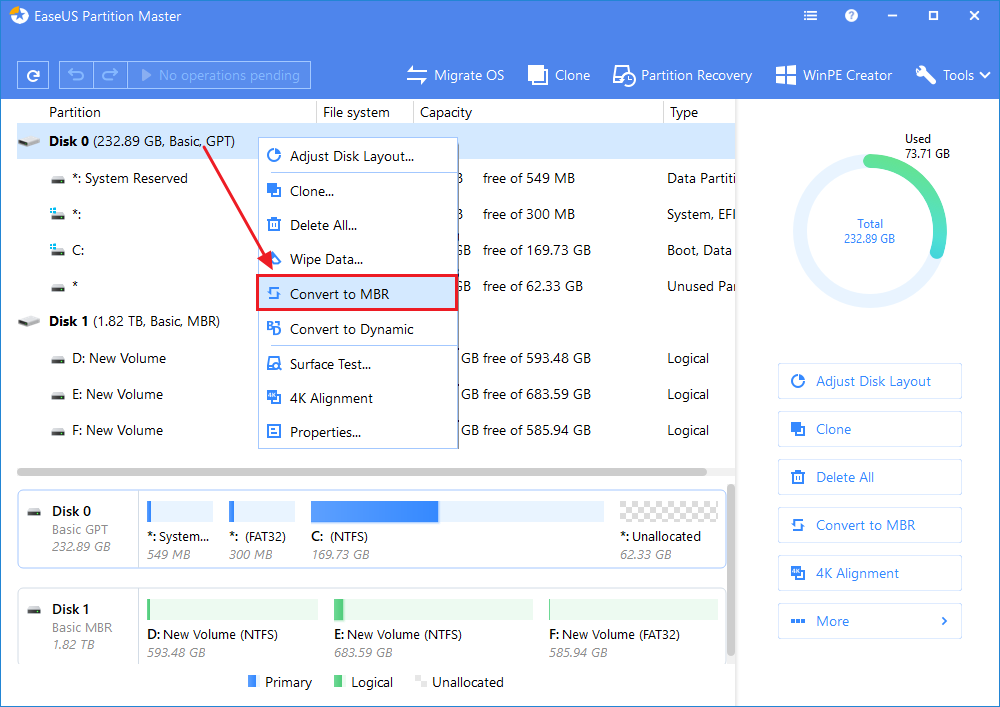
Method 2: Convert to MBR using EaseUS free partition software
Download and install EaseUS free partition tool on your computer, then follow the steps below to convert your GPT disk to MBR.
Step 1: Install and open EaseUS Partition Master on your Windows computer.
Step 2: Right-click the GPT disk that you want to convert and select "Convert to MBR". Then, you will add a pending operation.
Step 3: Click the "Execute Operation" button at the top-left corner. Next, click "Apply" and begin to convert GPT disk to MBR. All data is safe with EaseUS partition manager software.
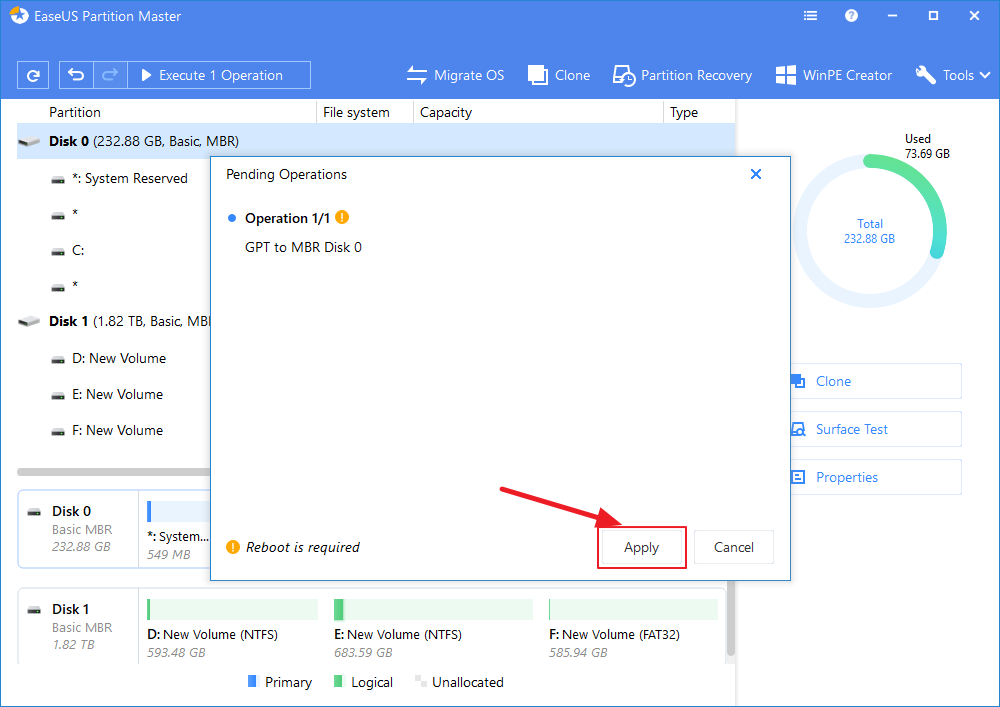
After this, you can restart PC, letting the system to keep all of the changes.
We hope this instruction is useful to you. If you have other solutions or any questions on this issue, please feel free to share or contact our support team.
in case you dont have installed windows:
if you don't have installed windows in your pc you just have to insert dvd and boot it and go to where it shows install button now simply
click on repair you pc
click advance option
click on command prompt
type in prompt = diskpart
check your harddrive num
in some cases it might be different but in majority they are 0
type = select disk 0 and hit Enter
type= clean
type = create partition primary
type = format fs=ntfs quick
and here you go
now restart you installation and your error will be fixed
Thanks
I hope this instruction is useful to you. If you have other solutions or any questions on this issue, please feel free to share or contact with me.
Comments
Post a Comment